Egg Shell Artist Emulates Van Gogh
By Violet Emslie Knudtson
HAD Van Gogh been fond of chickens he might have become proficient in another medium of art altogether. However, it is doubtful he'd have had the patience for egg shell mosaics. So it was left to Inez Garren of La Mesa to experiment with this form of art.

"I was helping a friend dye eggs," she says. "It occurred to me that a lot of time was spent each year dyeing eggs, only to have the colorful shells thrown out. Why not use them to create a picture?"
BUT ONE couldn't go about dyeing eggs just for the colored shells, and no one could eat that many eggs, anyway. Nevertheless, Mrs. Garren began saving shells from her kitchen and persuaded friends and neighbors to have theirs . She started by dyeing small pieces of the shells with regular clothing dye but, although the colors were beautiful, they wouldn't shade satisfactorily.
"In fact," Mrs. Garren explains, "nothing seemed to go right at first. I used too much glue and the tiny bits stuck to each other and everything else, including me."
Surely it will never work, was her thinking at this point. She kept experimenting, however, keeping the shells in larger pieces until after they were dyed, and learning how to pull out the inside skin without breaking too many shells. Dyeing large quantities of shells one color at a time was quicker and less troublesome.

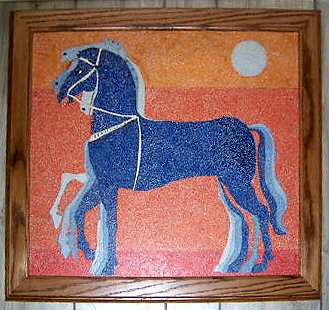
THE DELICATE colors of the dyed shells seemed to suggest flower arrangements. The first mosaic she completed, and one of her most successful, was her own14x24-inch design of California wild flowers. In the meantime she was studying famous flower paintings in art books. She began making exact copies of some of those by such artists as Matisse, Monet, Van Gogh, Breughel, Renoir, Pissaro and others. A copy of an R. Ruysch was her first shell mosaic to win a prize in an art show.
In the three years Mrs. Garren has been working in this medium she has completed more than 24 pictures, in sizes from 4x6 to 14x24 inches. From 150 to 200 hours are required to complete a 14 x 24. Due to a problem with her eyes Mrs. Garren can work only in daylight and a single painting may lake as long as two or three months to complete. But it is not as easy to see how she can make a clear, glass vase half filled with water look like exactly what it is—using only egg shells. When a mosaic is completed she covers it with layers of glue to give it sheen and a hard finish. If necessary, the background is touched up with water colors.
THE LATE Alexander King, author and connoisseur of art, displayed one of Mrs. Garren's eggshell paintings in his New York living room. It hangs beside two other of his favorite works of art—a George Grosz. lithograph and a Hirschfeld caricature. Mrs. Garren made the 8.x 10 mosaic especially for the delighted King from a print of "Alexander and the Talking Tree," a Parisian miniature reproduced from "Shahnama," executed for Irahim Sultan, ca. 1425.
Inez Garren has had her egg shell paintings hung in the Art Institute of San Diego and they received favorable comment. As far as she knows she is the only person engaged in this form of art. It has turned out to be a satisfying hobby.
By the time this article was printed in the March 29, 1974 Mexico, Missouri Ledger, eggshell mosaics had been nearly inextricably entwined with dyed Easter eggs.
You Can Turn Eggshells Into Colorful Easter Gift
Don't throw away those eggshells!!! Now you can make decorative plates with a mosaic look that can be made from those eggshells colorfully dyed with liquid or powder fabric dye.
This is an inexpensive, creative idea for unusual gifts or decorations. Arranging eggshell pieces into designs, does take a little time but results are well worth the effort.
The supplies you will need are white eggshells, Kit dye, tweezers, white glue, clear shellac or varnish, grocery produce-tray or oval shaped, heavy paper plate.
Draw or trace design onto item to be decorated. Rinse eggshells and remove any loose pieces of membrane. Color eggshells by dyeing in a simmering solution of 2 tablespoons liquid dye made of 1/4 package powder dye dissolved in 1 qt water for about 10 to 15 minutes. Eggshells vary in structure, resulting in different shades in the completed design. Gently lift and stir eggshells in dye solution, rinse in cold water, and dry on paper towels.
Then you can make a pattern by enlarging the chart from graph paper. Each square equals 1/2 inch. Draw into each square that portion of design which appears in corresponding square of the chart.
Trace design on tray or paper plate. Apply glue to a small area at a time. Press eggshell pieces into place until flat and the glue adheres.
Following the color chart, fill in outline of your pattern first, then fill in center area and finally background. Bread eggshells into smaller pieces as needed to fill open spaces.
When glue is completely dry, brush on a protective coating of clear shellac or varnish or use a plastic spray.
You may use any colors you desire that will be necessary for your design. The edge of the tray can be finished with a color coordinating tape. These would make cute Easter gifts, instead of the regular colored eggs.
Cedar Rapids Gazette, April 4, 1974. Eggshell mosaics were now an established staple of 70s craft culture.
Eggshell Excitement
But an often overlooked art material for making mosaics is one that is found in most every kitchen, probably in the garbage. This is eggshell. It can be broken, colored, and arranged to make lovely works of art that are both decorative and useful. Here are some ideas using eggshell.
Begin your project by rounding up the necessary items to make your finished product. For example, you might wish to make some creative containers such as pencil holders, vases, paper clip holders, or just an interesting holder for odds and ends.
The supplies you will need depend upon what you plan to make. Probably you will need liquid or powdered dye, tweezers, white glue, clear shellac or varnish, a small fruit juice can, a tuna can, a plastic detergent bottle and the white eggshells.
* * *
To begin, draw or trace your picture or design onto the item to be decorated with the eggshell mosaic. Rinse the egg shells carefully and remove any loose pieces of membrane. Color the eggshells by dyeing them in a simmering solution of two tablespoons liquid dye or 1/4 package of the powdered dye in a quart of water. Usually directions for dyeing are given on the package or bottle, so you may want to check there. Usually the dyeing process takes about ten to fifteen minutes.While you are coloring them, you may find that eggshells vary in structure, so that different shades may result which can add texture and intriguing variations in the finished design. After the eggshells have remained in the solution for the required period of time, gently lift and stir the shells about momentarily, rinse them in cold water, and carefully dry on paper towels.
* * *
Next take your background piece or container. Working on a very small area at a time, apply glue to it. Press broken eggshell pieces into place until they are flat and adhere. Allow the glue to dry completely. Then brush on a protective coating of clear shellac or varnish, or you may use a plastic spray. Allow it to dry thoroughly and it will help the mosaic to last for a much longer period of time.For specific items such as a vase or pencil holder, a few extra points of direction should be considered. If you are using a bottle that is plastic, cut the top from it with a razor blade or other sharp cutting tool. Use your glue sparingly so that the eggshell pieces will not slide down the bottle's smooth surface.
Special holders for pencils and clips can more easily be identified if they are labeled. To "write" words with eggshell bits, position the pieces to form the letters first. Then fill in the background. Break the eggshells into smaller pieces as needed to fill open spaces. If your containers have rims that show above or below the mosaic portions, you can color them with paint or fingernail polish.
Try some adventures with eggshells. You will find them very exciting as you discover ways that you can include them in art.
Corpus Christi Times, March 28, 1975.
Eggshell Mosaics
Patience the Main Material for Hobby
Copley News Service
Mosaic making is an ancient art known to many civilizations. And it remains a popular hobby with a great variety of people whose artistic abilities can range from very little to great, depending on the type of material used and whether the pattern is original or copied.
Seed mosaics and others made with beads, bits of metal and many types of material are popular.
Eggshells can be used to achieve very pretty effects. And outside of patience, white glue and paper, hardly any material is needed.
Wash out raw eggshells or peel away this outer layer from two hardboiled eggs. Crumble them so you have small bits. Black or brightly colored construction paper, used for a background, will contrast well with white shells.
The first step is to lightly outline a design with a pencil. It is a good idea to choose something fairly simple which has a pattern that is repetitious. A flower petal is one good idea.
Once the design has been sketched, squeeze white glue from a tube so that a very fine line covers it. Be sure to work on only a small section at a time since the glue dries rapidly. Work quickly to sprinkle the bits of shells.
A toothpick proves handy for moving the pieces slightly and also serves to press them firmly into place. If you depend on fingers to set them firmly, you will find they soon get sticky and tacky.
Work steadily until the design is all completed. Then, allow the shells to dry thoroughly. Shake off any excess pieces which might remain, though if you have pressed carefully, there should be very little loose material.
The Abilene (Texas) Reporter-News, July 20, 1975. Besides giving a nice description of the process, the reference to Victorian and Mexican eggshell mosaics is intriguing. It’s also the first time I’ve seen a reference to grout of any kind – I’ll be trying the tempera paint as suggested.
Mosaic With Eggshells
By Judy Harper
Picture making with bits old colored stone, glass, etc. is one of the oldest known art forms. It was brought to a height of beauty and perfection by nearly every civilization that used it, from the Babylonians and Assyrians, to the Egyptians, and then from the Romans to the great Byzantine Empire, where Mosaic Art was truly perfected to glorify and adorn the early Christian churches.
Victorian ladies whiled away idle hours making theirs with bits of colored eggshells, and it is a way of making pictures that continues even today.
Their method was to dye the empty eggshells first and then, bit by tedious bit, put together a charming composition, usually a bowl of fruit or flowers.

An eggshell mosaic may be made on any surface suitable for painting, but this particular one was done on 3/4 inch white pine, as it is one of a set of whimsical vegetables intended for kitchen decor.
The surface must first be prepared with two smooth coats of gesso.
When you begin collecting eggshells for mosaic making, be sure to wash them with clear, cool water and remove the thin membrane, which actually peels off quite easily.
When your picture surface is ready, coat a small section at a time with thinned white craft glue. Then, place a section of eggshell on the wet glue and press it down flat with the bowl of a spoon. As you flatten it, it will crack into many small pieces, which will subsequently produce the mosaic effect. If you don't remove the membrane the shell will not crack satisfactorily.
Cover the entire picture surface in this manner and be sure to fill in any spaces with additional bits of shell. Tweezers and toothpicks are almost essential tools for this art.
When the glue is thoroughly dry, gesso once. Let dry, paint the entire surface with a background color (I use acrylic paints) and transfer a suitable pattern to the painting surface.
Paint your chosen design rather simply, with little or no shading.
For subject matter almost anything will do, as long as you keep it simple and logical for mosaic.
When the painting is dry, spray twice lightly but thoroughly with a clear acrylic sealer. When this has dried, cover the entire picture heavily with white tempera paint. Do not use acrylic paint for this step. The tempera should be at a smooth, creamy consistency.
Let dry for just a minute or two and then wipe the picture with a soft, dry cloth. Like magic, your mosaic picture will appear, as the while tempera sinks into the cracks between the eggshells and serves as grout.
Let the picture dry for several hours and then seal with a coat of whatever glaze or varnish you prefer.
Frame or finish as you wish.




 Posts
Posts

